- Previous: Using the APIs
- Up: Using the APIs
- Next: Sample Code
oAuth
Introduction
Most API calls performed by a registered application are made on behalf of a user. Our APIs use the OAuth 2.0 specification to allow our customers to authorize access to their Capital One accounts without having to hand out their login credentials.
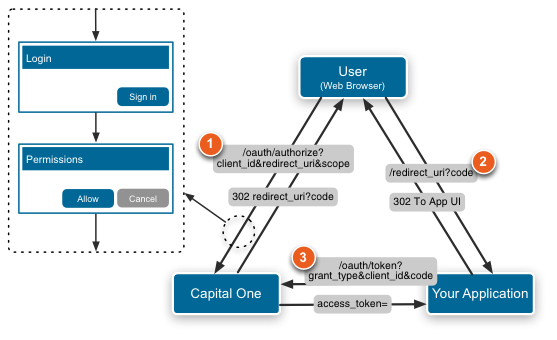
Using the server-side flow (referred to as "Authorization Code Grant"), your web or mobile application will redirect the user to a web page where they authenticate and authorize the specific access and permissions being requested.
Server-Side Flow

1. Redirect the user to the OAuth Flow
Your application must use one of the following button styles to link to the OAuth page.
![]()
![]()
Upon clicking, the user is redirected to the following URI (sandbox URI shown):
https://auth-sandbox.capitalone.com/oauth2/authorize
    ?response_type=code
    &client_id=[API Key]
    &redirect_uri=[Callback URI]
    &scope=[Permissions list]
    &state=[State]
Where:
- API Key is the client credential you receive from registering your application
- Callback URI is the URI of your application that will handle the response from the flow. This URI must have the same prefix as the URL associated with your registered application.
- Permissions list is an optional comma delimited list of permissions to override the default permissions associated with your application. This would be used to limit the request to fewer permissions. Adding permissions that are not associated with your application is not permitted. Permission names can be located in each API documentation pages.
- State is a random generated unique string that helps guard against Cross-site Request Forgery (CSRF) exploits.
2. The user is prompted to authorize your application and redirected to your callback
The user will be prompted to login and may be prompted to answer verification questions. Descriptions of the permissions listed in the scope parameter are displayed to the user. Finally, the user will choose to allow and deny access to your application and is redirected back to your application via the redirect_uri parameter.
If the user authorized your application, the browser is redirected (via HTTP 302) to:
[Callback URI]
    ?state=[State]
    &code=[Code]
If the user declines, the browser is redirected (via HTTP 302) to:
[Callback URI]
    ?state=[State]
    &error_reason=user_denied
    &error=access_denied
    &error_description=The+user+denied+your+request.
Where:
- State is the random and unique string passed in the initial step
- Code is the authorization code that is used obtain the access token
Your application should verify that the state parameter return is identical to the value that was passed into the URI of the first step in order to guard against CSRF.
3. Request the access token
To finalize the process, your application must now exchange the authorization code for the access token. This is accomplished using a server-side request to https://auth-sandbox.capitalone.com/oauth2/token (sandbox URI shown):
POST /oauth2/token HTTP/1.1
Host: auth-sandbox.capitalone.com
Content-Type: application/x-www-form-urlencoded

grant_type=authorization_code&client_id=[API Key]&code=[Code]&redirect_uri=[Callback URI]
Where:
- API Key is the client credential you receive from registering your application
- Code is the authorization code that is used obtain the access token
- Callback URI is the URI of your application what will handle the response from the flow. This URI must have the same prefix as the URL associated with your registered application.
The server will return with a JSON object in the body of the response with this format:
{
    "access_token" : "[Access token]",
    "token_type" : "bearer",
    "expires_in" : [Expiration],
    "refresh_token" : "[Refresh token]"
}
Where:
- Access token is the string value necessary for making future API calls
- Expiration is the number of seconds until the the access token expires. Optionally, a null value means that the token will not expire unless it is revoked by the user.
- Refresh token is the string value necessary to exchange an expired access token for a new access token without having to send the user back through the full OAuth authorization flow. This value is optional and may appear depending on the nature of application and the permissions it has been granted.
Once your application has received the access token, it may begin making API calls on behalf of the user. Refer to the "Making API calls" page for more information.
4. (Optional) Refreshing an access token
Your application may need to replace an expired access token with a new one. If you received a refresh token with original access token, it may be passed to https://auth-sandbox.capitalone.com/oauth2/token (sandbox URI shown).
POST /oauth2/token HTTP/1.1
Host: auth-sandbox.capitalone.com
Content-Type: application/x-www-form-urlencoded

grant_type=refresh_token&client_id=[API Key]&refresh_token=[Refresh token]
Where:
- API Key is the client credential you receive from registering your application
- Refresh token is the string value received when the access token was requested
The server will return with a JSON object as described above in step 3.
- Previous: Using the APIs
- Up: Using the APIs
- Next: Sample Code
